MUR-D Dev Blog 1
For my final year project, I will be working on the Melbourne University Racing (MUR) Autonomous Race Car project as an Autonomous Perception Engineer. My responsibilities include completing the problem formation, concept selection, design, assembly and testing of perception system. My tasks may include camera and/or LiDAR selection and calibration, hardware integration, data collection, and learning, as well as the design and implementation of perception, visual odometry, and/or localisation and mapping algorithms.
While MUR-D (Melbourne University Autonomous Driverless) is not the official designation of the project (yet), I thought that it would be a cleaner way to refer to in blog posts.
For this project, I am planning to write up a series of blog posts which will allow me to document, reflect and plan on what should be done next. This will be similar to what I have done in the past for the National Instruments Autonomous Robotics Competition (NIARC).
While this is not meant to be a proper technical documentation, I will do my best to capture as much details as possible for parts which I have found interesting or challenging. Listed is the table of contents, feel free to jump to the section which you find more interesting. Each section should be more or less independent, with their own context and backgrounds included at the start.
Experimental Platform
In this section, I will be discussing some of the platforms which have been chosen for experimenting with smaller scale robotic platforms. These will be very helpful for research and development before we receive our required hardware. They are also easier to transport and are small enough to be tested in indoor environments.
Nvidia Jetson Nano
The main computer used for this will be the Nvidia Jetson Nano, which is a rather powerful computing device with CUDA support. With some optimisation, it is possible to run various neural networks in real-time. This includes image classification, object detection, image segmentation and natural language processing. The figure below provides a quick overview of the device’s performance. Keep in mind that the device retails for $99 USD and around $200 AUD in Australia.
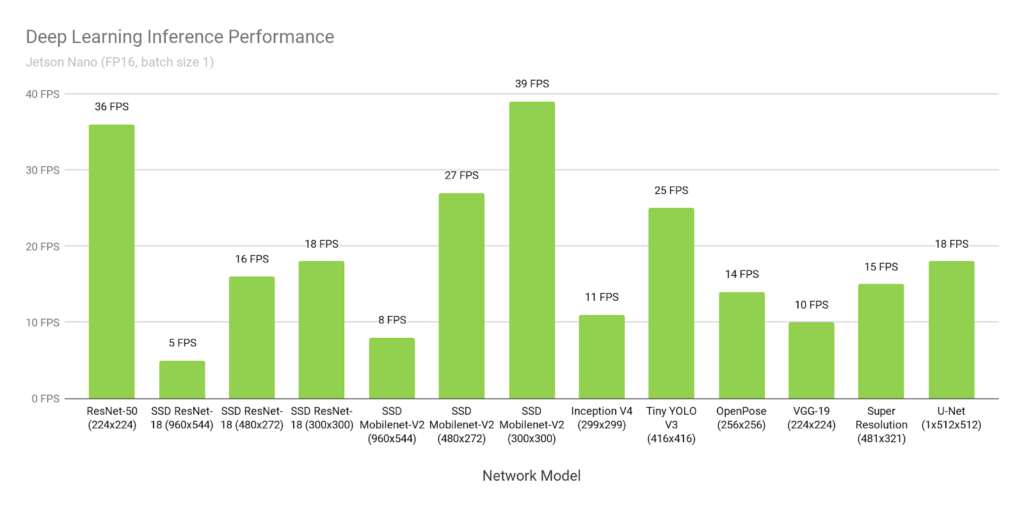
The interesting part is that Nvidia claims it is capable of running the Tiny YOLOv3 object detection network at 25 FPS. However, this can only be achieved when working with Nvidia’s DeepStream SDK. While the DeepStream website shows that the Jetson Nano can handle up to 8 1080p/30 FPS video streams concurrently, the detection results do not seem very accurate at all. Its quality and performance will be assessed further once I have my Jetson Nano fully setup.
JetBot
JetBot is an amazing open-source initiative created by Nvidia to educate people (young and old alike) about AI algorithms can be deployed and used in interactive and fun ways.
While there are many robotics projects out there powered by Raspberry Pi and Arduino devices, JetBot takes a step forward by offering accelerated inference capability, allowing deep learning networks to be run a close to real time. It is coupled with clear and intuitive instructions and jupyter notebooks to guide people through its functionalities.
However, while I was first setting up my Jetson Nano, I felt like it was really sluggish and not really responsive at all. After some googling and digging around, I came to the conclusion that the root cause could be the micro SD card being too slow. However, I have not yet confirmed this, but I really do hope that a faster SD card will fix the responsiveness issue.
JetRacer
JetRacer is another step up from JetBot. It is an autonomous race car based on existing RC platforms and Jetson Nano. Officially, the Latrax Rally and Tamiya TT-02 are supported. After seeing the official demo, I was really impressed by its performance and decided to procure all the bills of materials myself and try to build one.
THe main different between the Latrax and Tamiya cars is the size and speed.
- Latrax variant is smaller and slower
- Tamiya variant is larger and faster
In the end, I decided to go with Tamiya as I have previously built a dozen Tamiya model kits when I was smaller. I have always been impressed by their impeccable workmanship and flawless fit and finish. With some other model kits providers, the plastic pieces may not always be machined precisely, which often translate into many more hours of filing, refining and endless frustrations. After receiving my JetRacer kit, I spent almost a whole day putting it together.
The assembly turned out to be a lot more difficult than I previously anticipated. One particular thing I did not expect is, how many spots I had to apply grease to lubricate all the moving parts and joints. It got to the point where I just gave up washing my hands during the build and left my hands greasy and sticky till the very end.
However, one thing I completely did not expect was how I came to appreciate the amount of knowledge and experience required to design a 4WD RC car like this. I walked in with the expectation that this was going to be a simple and straightforward build, which should not be significantly more complex than my previous 2-wheel differential steering robots. It turned out that I was completely wrong.
From the Tamiya TT-02 instructions manual you can see how detailed and complex the RC car is. In my opinion, the most impressive parts are the 4WD design, differential steering and the suspension. Jumping from working with software to building a sophisticated RC model really provided me with a new perspective on mechanical engineering and design. It would be very interesting to see how the staff members in Tamiya come up with these design, test them and manufacture these kits at scale.
Concept Generation and Selection
Concurrent to exploring the Nvidia Jetson Nano and its related open source projects, the concept generation and selection took place and the team started investigating the various concepts and ideas we can use to obstacle detection, localisation and mapping. For my part, I have specifically explored:
- High level overview on potential sensors
- Suitable object detection networks
- Training a basic cone detector as a proof of concept
Potential Sensors
From the provided cone specifications, it is clear that we would require sensors with good resolution and range. Good resolution is required since the cones are small relative to the size of the car and track. Good detection range is required to detect cones in advance, so that the car can execute its SLAM routine and control planning as it approaches the various turns, hairpin and chicanes.
Since RADAR and Ultrasonic sensors have average and poor resolutions respectively, they can be safely eliminated from the list of potential sensors. This leaves us with the LIDAR and vision-based approaches.
AMZ Driverless
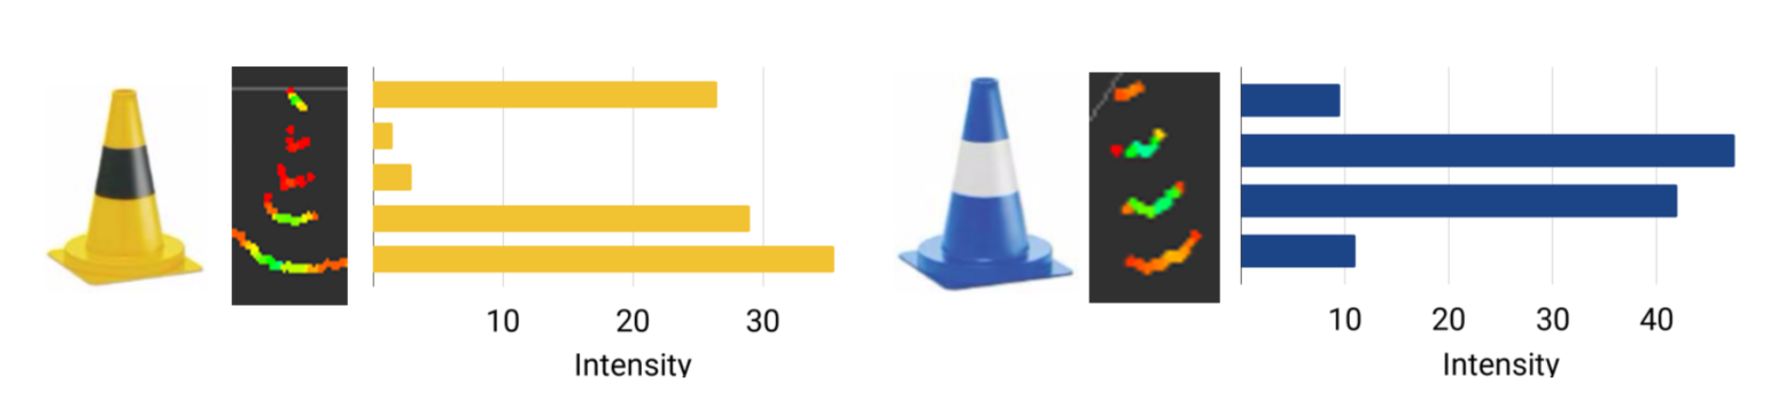
For exploring existing solutions and implementations, the AMZ Driverless paper was used for reference as it is arguably the state-of-the-art and leading autonomous race car in Formula Student Germany. AMZ Driverless project is open-source and many of their resources can be found on GitHub.
It was interesting to see how AMZ used the LIDAR returned intensities to differentiate between yellow and blue cones. In particular, since the yellow cone has a bright-dark-bright pattern while the blue cone has a dark-bright-dark, it was then possible for them to this pattern to deduce whether a cone is yellow or blue without using a camera.
Object Detection
Here, the various different image detection networks will be discussed and compared. The comparison metrics such as mAP (mean average precision) and IOU (intersection over union) will be used for performance evaluation. The main contender in this section will be YOLO (You Only Look Once).
While YOLOv3 was the definitely the state-of-the-art object detection network when it was first released in 2018. Since then various new networks have been released, some with better detection results, while others are optimised for even faster inference speed.
State of the Art Networks
The table below shows a small list of detector networks considered. While this list is not comprehensive by any means, various new networks have been added as an attempt to filter out a worthy successor to the original YOLOv3. In particular, csresnext50-panet-spp-optimal network demonstrates significant improvements over the original YOLOv3 while still delivering near real-time performance at 35FPS.
Other network architectures improves upon the original YOLOv3 network by integrating spatial pyramid pooling (SPP) to the original network, which results in better feature extractions. On the other hand, the idea of training a sparse network and pruning near-zero weights were applied on SlimYOLOv3 to achieve similar network performance with a fraction of the original amount of network weights (the pruning threshold can be defined specifically, paper was presented with 50%, 90% and 95%). CornetNet takes a different approach to object detection, as it detect object bounding box as a pair of key points and was able to achieve impressive results over the existing one-stage detectors.
| Name | mAP | AP50 | AP small | FPS | BFLOPS |
|---|---|---|---|---|---|
| YOLOv3 (416 x 416) | 31.0 | 55.3 | 15.2 | 46 | 65.9 |
| YOLOv3 (608 x 608) | 33.0 | 57.9 | 18.3 | 25.6 | 140.7 |
| YOLOv3-SPP | 36.2 | 60.6 | 20.6 | 30 | 141.5 |
| csresnext50-panet-spp-optimal (608 x 608) | 38.4 | 65.4 | 22.1 | 35 | 100.5 |
| CornetNet-Squeeze | 34.4 | - | 13.7 | 30.3 | - |
| SlimYOLOv3-SPP-50 (416 x 416) | NA | NA | NA | 67 | - |
The comparison metrics used are:
- mAP (mean average precision)
- AP50 (mAP at 50% IOU)
- AP small (average precision for small objects with area smaller than 32 x 32 pixels)
- FPS (frames per second) on a GTX 1080 Ti
- BFLOPs (billions of floating point operations)
- MS COCO dataset is used to training and validation
- Note: In the paper, SlimYOLOv3 was trained on the VisDrone2018-Det benchmark dataset, hence no data is available.
- For a more detailed table on existing object detection networks, please see the CSPNet paper, which provides a really comprehensive overview of existing networks and their performance.
In the end, no single network was chosen for the project. Instead, various different networks would be trained to validate their actual performance on our own dataset. After that, we would have a better idea on what is the most suitable network for this particular project.
As a side note, while attempting to construct this table for this blog post, I realised that the Jekyll and Kramdown does not define a default table style. So I had to find the relevant style and add it to the base configuration of the static site generator. Otherwise, the table would have been presented without borders.
Proof of Concept
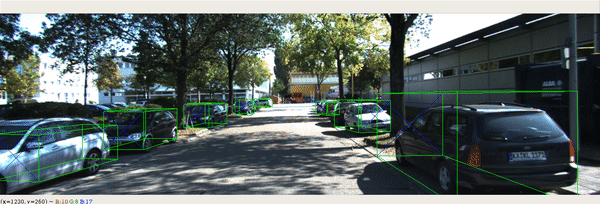
For an early stage proof of concept, a YOLOv3 detector network (416 x 416) was trained on a subset of existing open-source traffic cone dataset from MIT Driverless, and also some images which we have taken during a recent track day event. The trained detector network performed way better than I initially expected.
class_id = 0, name = blue   cone, ap = 93.21%   	 (TP = 291, FP = 55)
class_id = 1, name = orange cone, ap = 90.15%   	 (TP = 176, FP = 22)
class_id = 2, name = yellow cone, ap = 92.41%   	 (TP = 366, FP = 41)
 for conf_thresh = 0.25, precision = 0.88, recall = 0.90, F1-score = 0.89
 for conf_thresh = 0.25, TP = 833, FP = 118, FN = 97, average IoU = 69.26 %
 IoU threshold = 50 %, used Area-Under-Curve for each unique Recall
 mean average precision (mAP@0.50) = 0.919253, or 91.93 %
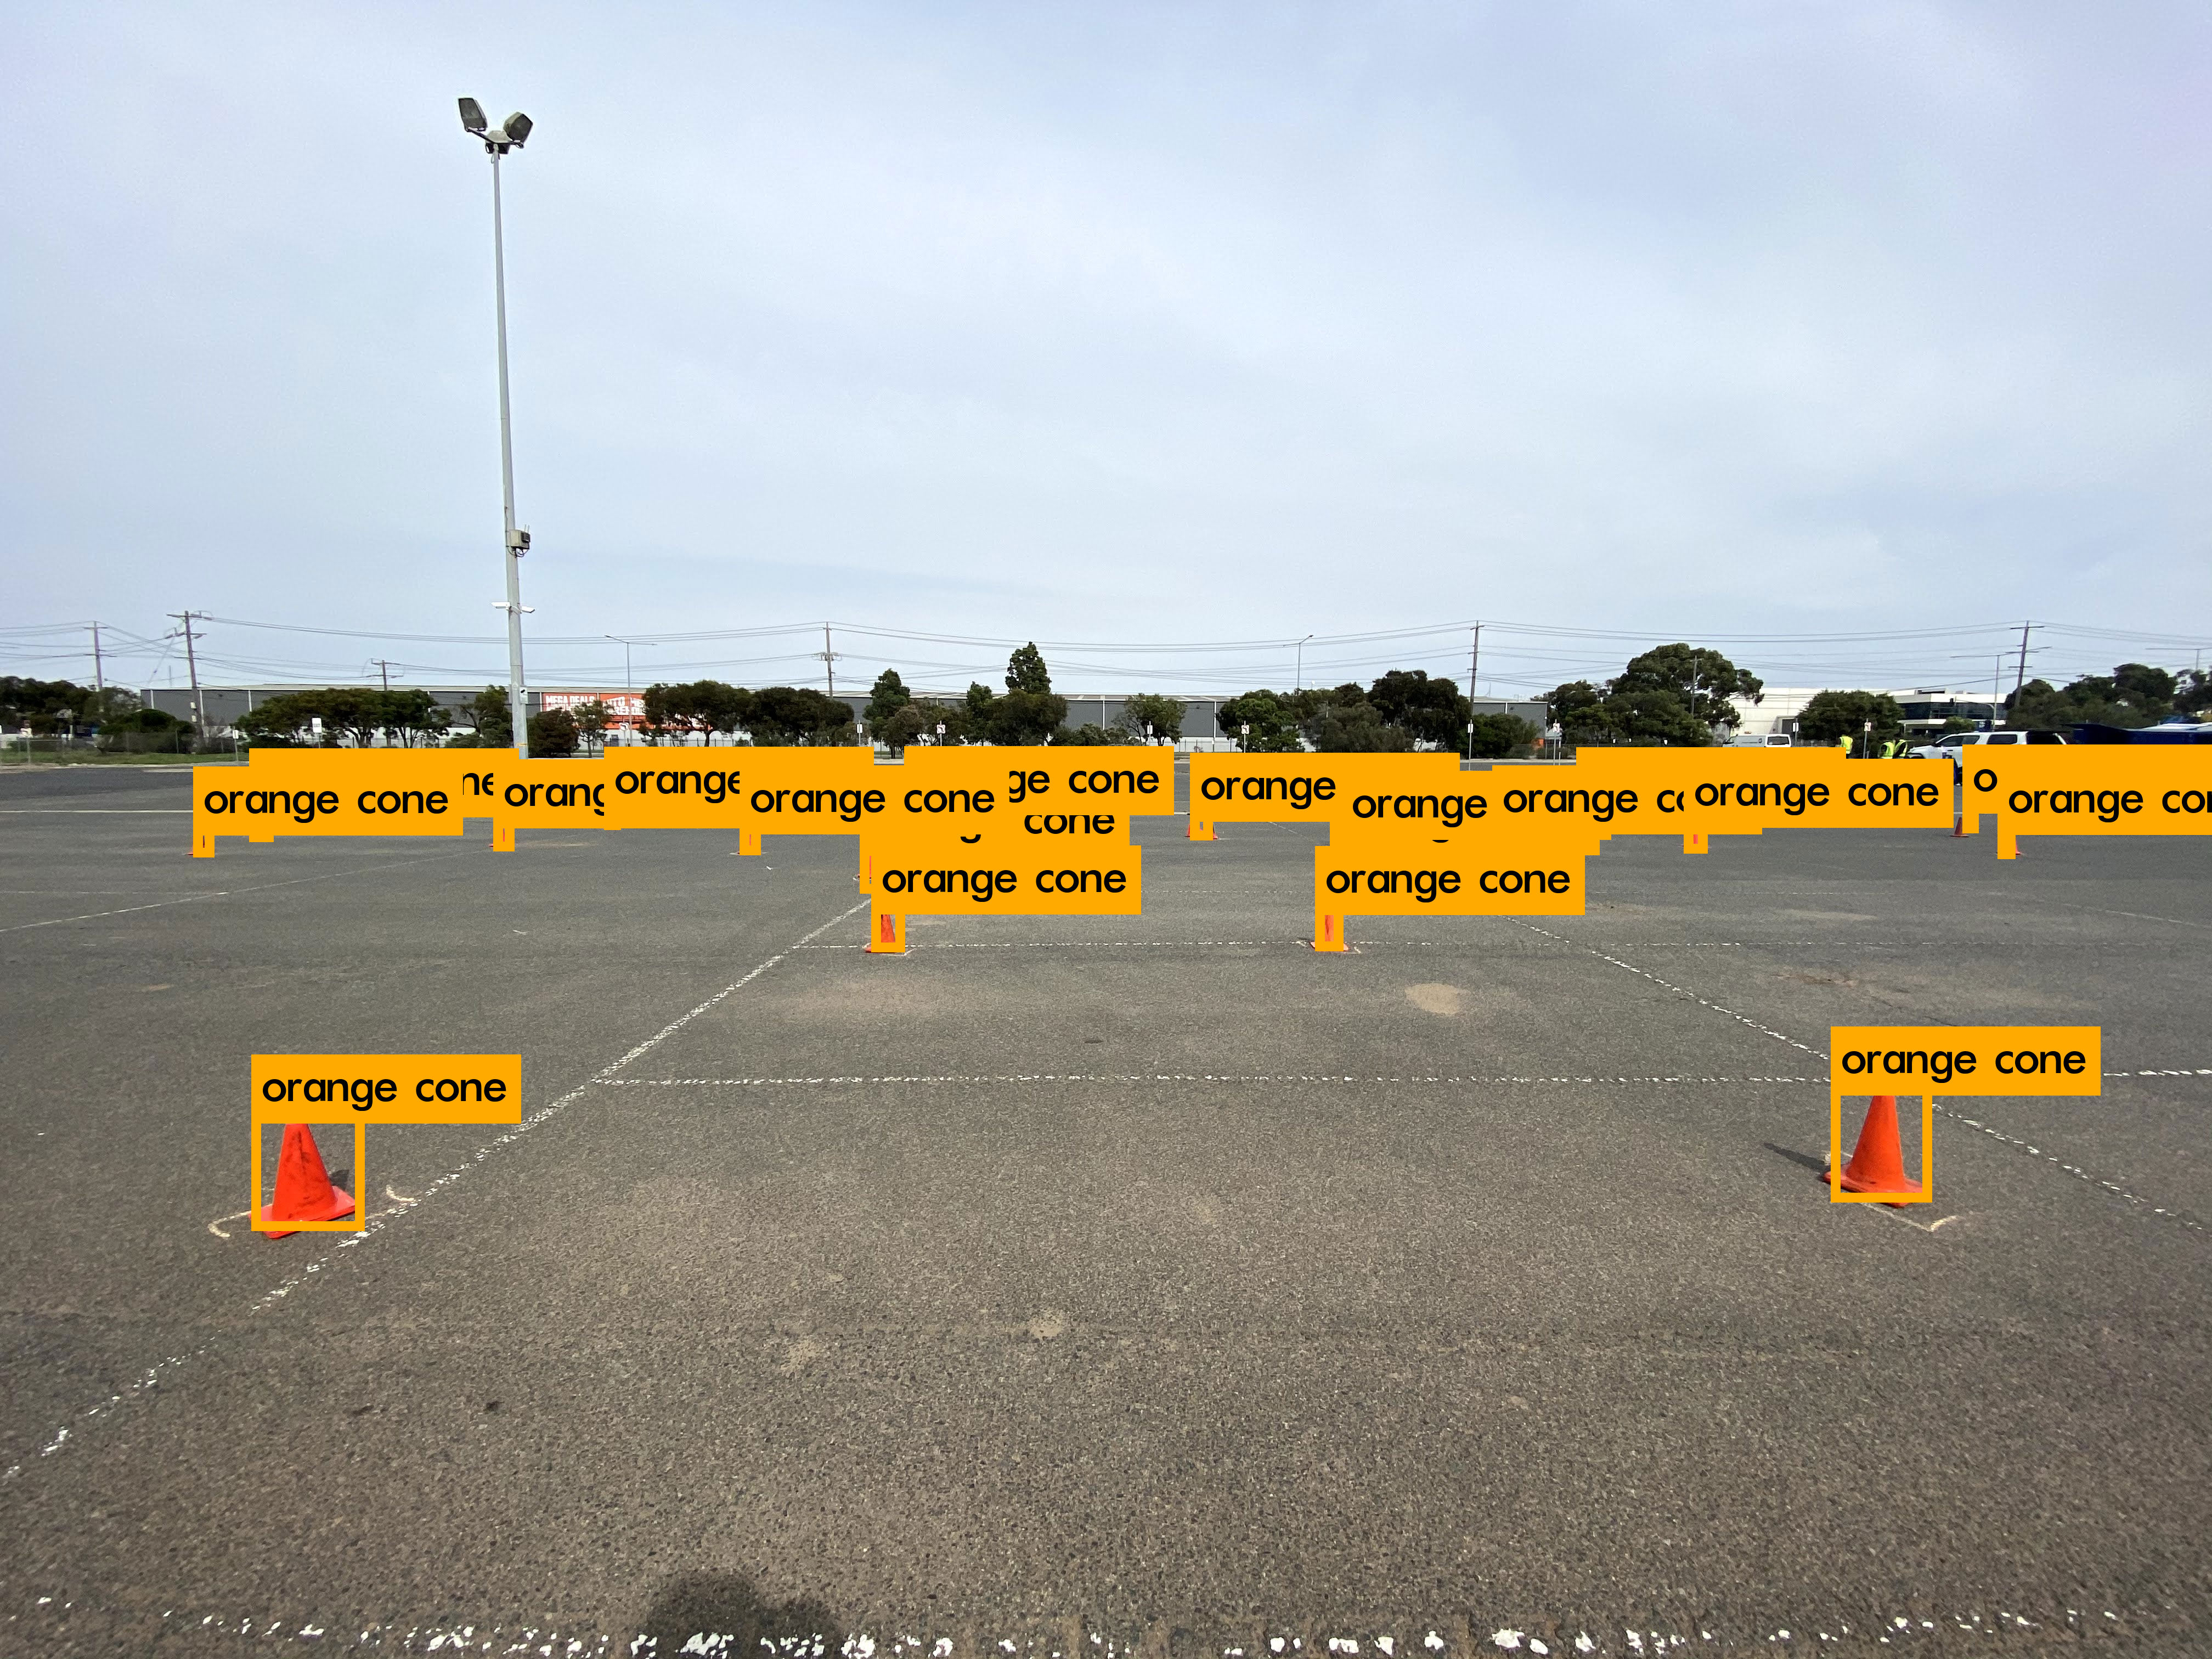
While the mean average precision is good, the average intersection over union (IoU) is quite poor, as the smaller cones tend to have a much smaller bounding box than their actual size. In other words, the predicted bounding boxes should be larger in order to encapsulate the entire cone properly. This can be clearly seen in the sample prediction image above. Once a cone can be properly captured and bounded, then the cropped cone image can be used for key point extraction.
The root cause of this issue should be due to the inaccurate labels given for training. When the images were been labelled, it was rather difficult to accurately draw the bounding boxes for very small cones. The situation was made worse by the fact that our labelling software Yolo_mark does not provide a zooming feature. So our current plan is to either upgrade to another labelling software which supports zooming in, or pre-cut the images into 4 separate images before labelling, so that all the images would appear 2 times larger.
Google Colab
Since my existing desktop’s graphics card does not have sufficient VRAM to train a full YOLOv3 network, I started looking for alternative ways for training a neural net on a budget. Following my academic supervisor’s advice, I tried looking into Google Colab and was pleasantly surprising that they sometimes provide users with new and upgraded GPU instances (namely the Nvidia P100 and Tesla T4). Given that this is a free 12 hours instance, I would say that they are pretty generous with this allocation. With these new hardware, people can potentially cut down their required training time by 2-4 times.
Coronavirus
You may be wondering why I am mentioning coronavirus here, but as it turns out it has had unforeseen impact the university’s additional funding for our project. However, we would still need to wait until the final confirmation from the faculties to see whether it is actually going to affect us or not.
A few members of the autonomous team have been overseas and we are still uncertain whether they can make it in time to join us for the upcoming external concept review process. I really do hope that we are able to contain the virus effectively and allow everyone to return back to university as usual. John Hopkins University provides a really good dashboard for visualising the real-time status of the virus spread and also the historical growth, which can be accessed here.
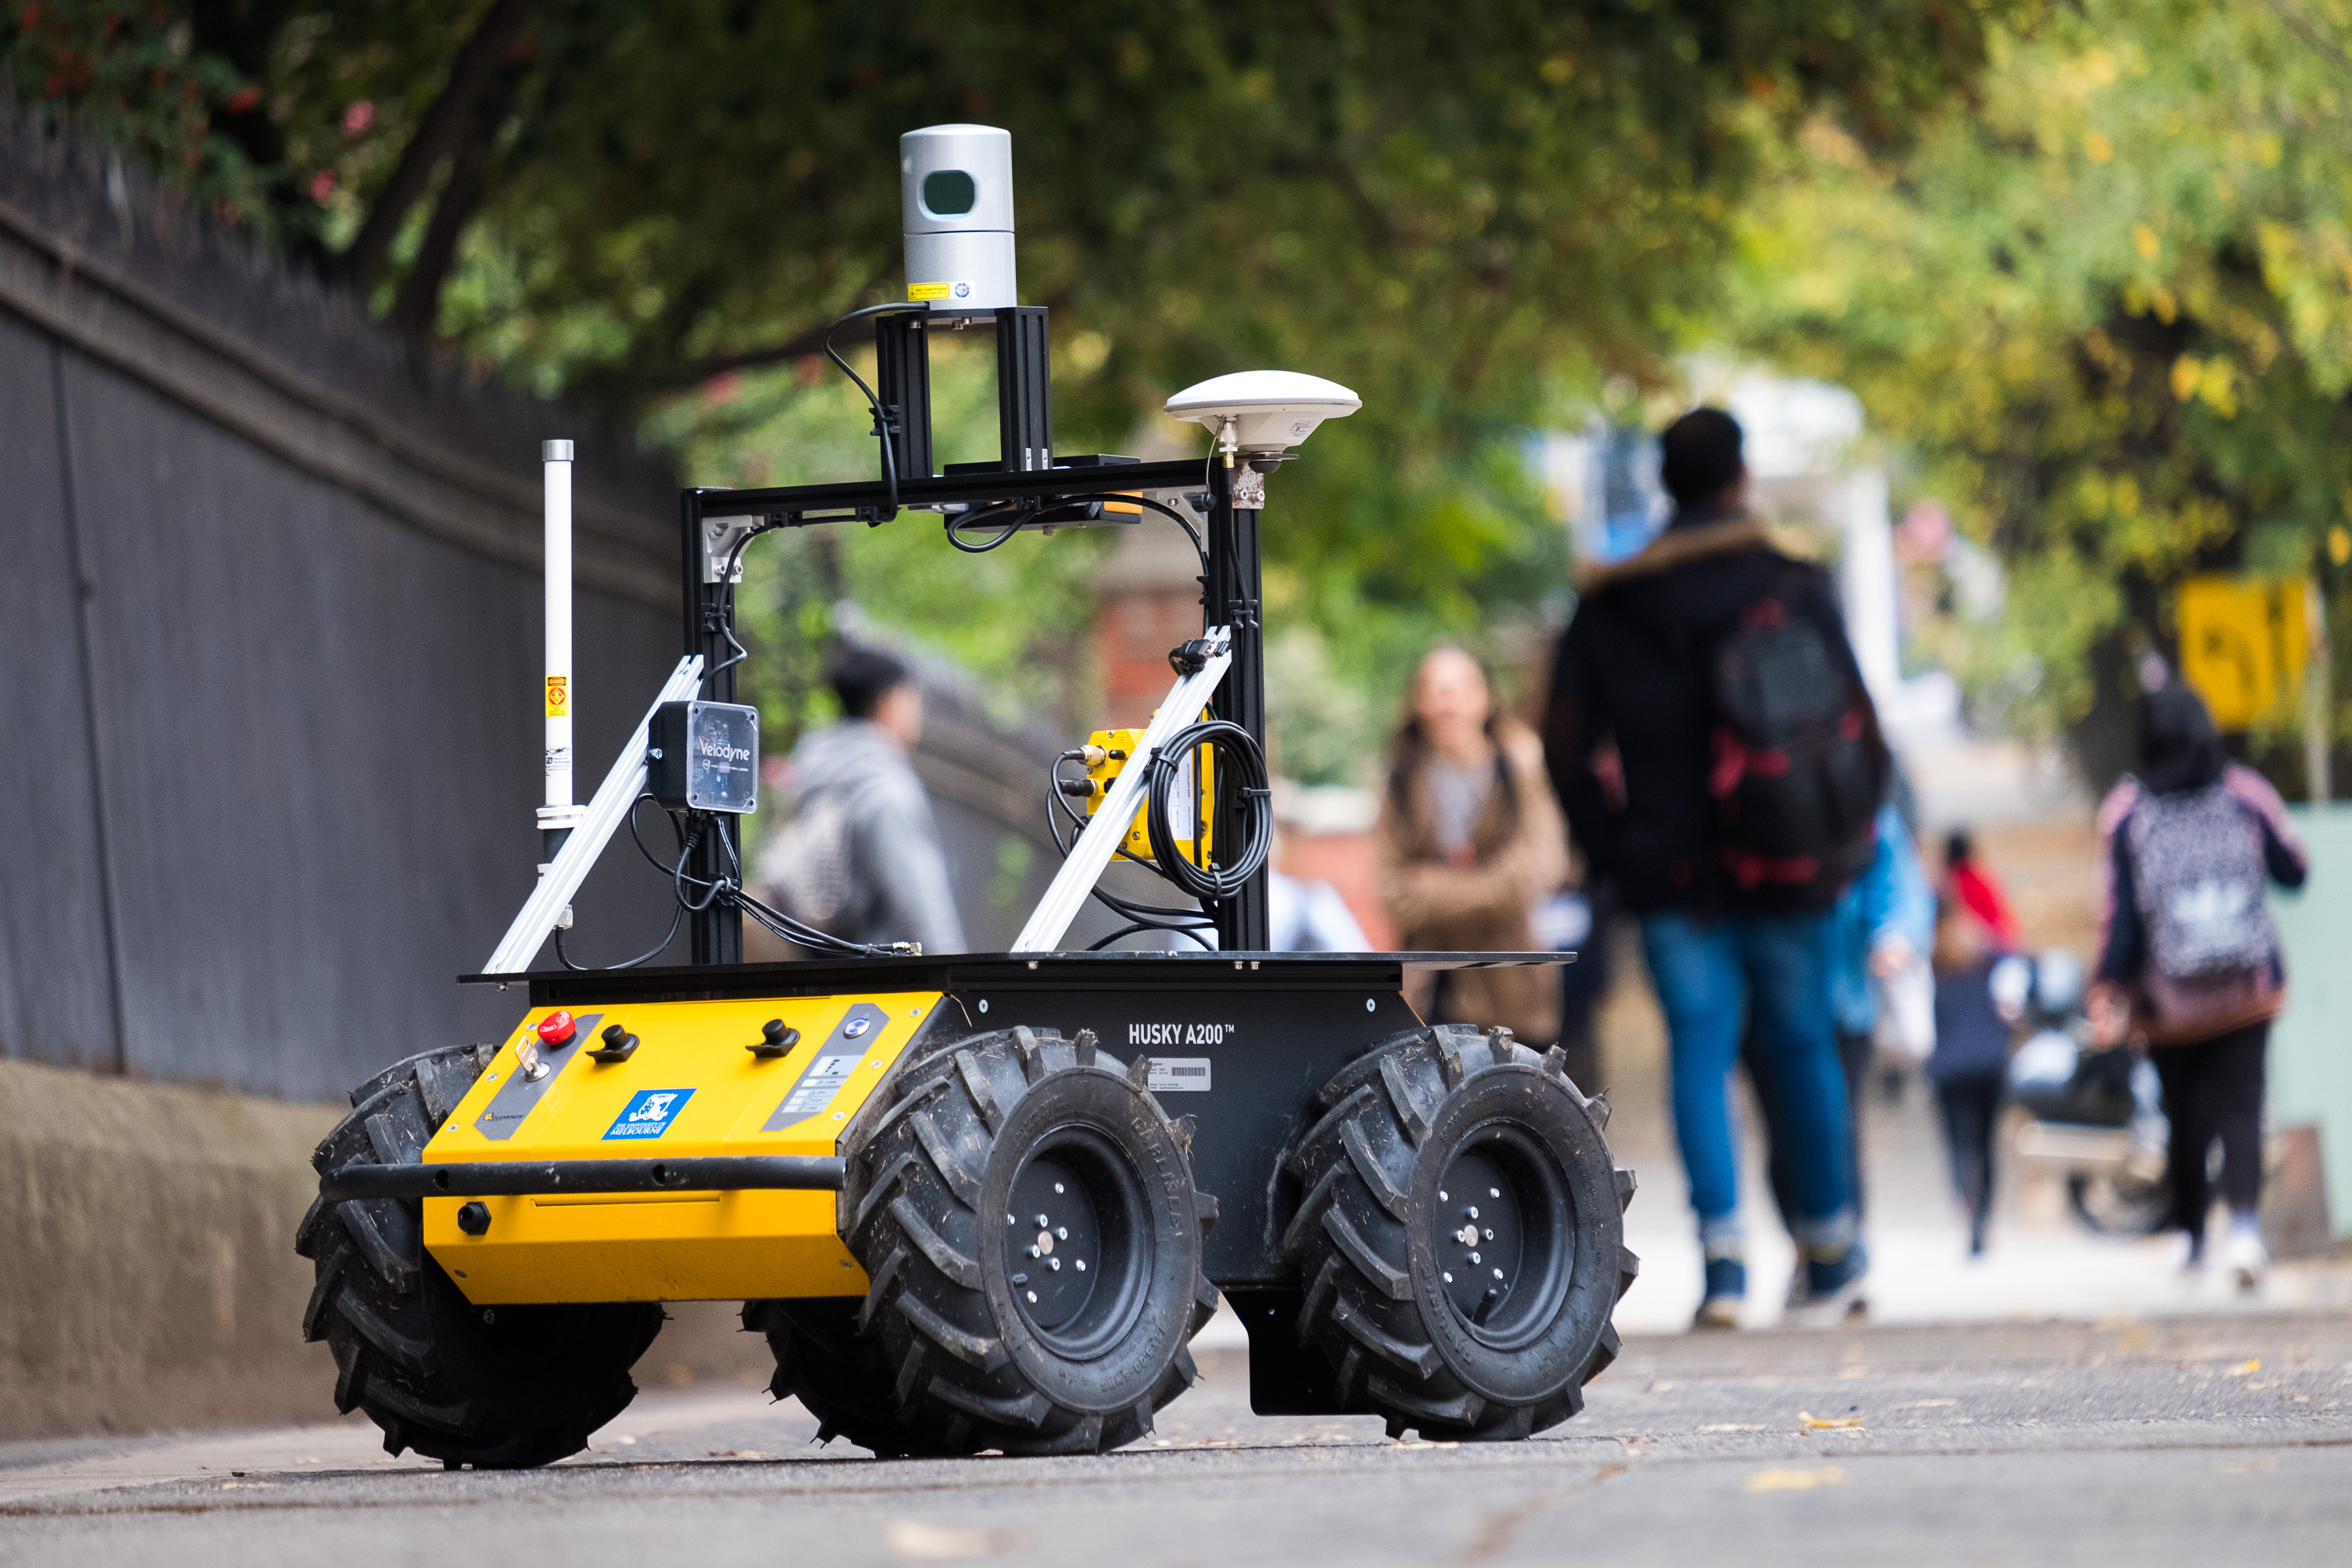
In the worst case where we get very little to no funding for the project, we can still rely on the “Husky” robot for early-stage research and development. It also has a comprehensive suite of sensors including 3D LIDAR, Stereo Camera, GPS and IMU.
What I have learnt
- It is very important to prepare the deep learning training/validation data properly. Even if the networks are somewhat robust to noise, any significant discrepancy in the data labelling stage would have undesired effect on the trained network.
- Atlassian Confluence and Jira cloud for personal stuff is really useful for project planning (free for < 10 people)
Next steps
- Specific hardware selection (in particular in camera)
- Software requirement for LIDAR and point cloud filtering / segmentation
- Explore 3D bounding box detectors (GIF below sourced from here)